Style Utilities is included in the Publisher Suite . Find out more
Style Utilities is a growing collection of functions designed to aid in formatting text quickly and accurately.
Currently Style Utilities includes the following eight functions:
1. Conditional Paragraph Style Changer
This utility changes the paragraph style if there is a specific character in the first user-definable number of words. Additionally, the first words can optionally have a character style applied. For example: any paragraph which has a period (full stop) in the first two words can have an alternate style applied. One very useful application, is in conjunction with Drop Words. Very often, if a paragraph starts with a paragraph number, the number of drop words must be set to two instead of one. Conditional Style Changer can identify these paragraphs and change the paragraph style so Drop Words can apply the drop to the correct number of words.
2. Style Between Delimiters
This utility applies a character style to text between two user-defined delimiters. The length of the text can be limited by both minimum and maximum values. For example: all text surrounded by parenthesis which is less than 20 characters can have a subscript style applied.
3. Create Multi Line Styles
This utility changes paragraph styles based on the number of lines the paragraph takes up. This is especially useful for quickly applying styles to header paragraphs.
4. Consecutive Styles
Consecutive Styles is a utility which applies styles to consecutive paragraphs of specific styles.
It can be used in a number of different situations. It can be used to change the style of any paragraph of a particular style followed by a paragraph followed by a specific other style.
It can be used to change the style of a paragraph preceded by a specific style.
It can also be used to change the styling of a number of identically styled paragraphs, by either changing the first one or the last one.
5. Apply Next Styles
InDesign has the ability to define “next styles” to paragraph styles. “Next Styles” are paragraph styles which should be applied after the defined one. This is great when typing or pasting in text. You can set up a whole series of styles which can each be applied in turn.
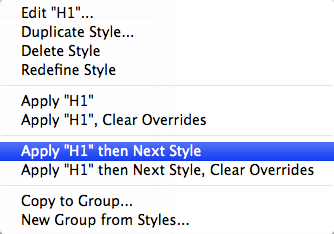
When you have text which is already placed, it’s a bit trickier to get “next styles” to be applied, but that can be done as well. You need to select a span of text and right click on the paragraph style in the paragraph style panel. this brings up this context menu:

"Apply then Next" context menu
After selecting Apply [style] then Next Style, the entire “next style chain” will be applied to the selected text.
A problem becomes apparent however, when you have a style scattered around your document which should have a series of styles following it, but it can not be looped in a structured loop (for example, if you have a series of headings and then a non-determined number of body text paragraphs). That’s why we created the “Apply Next Styles” function. It searches the document for every instance of the style you select and then applies all the “next styles” in turn.

6. Create Hyperlinks from URLs
This utility will automatically create hyperlinks from any text it recognizes as a valid URL. It’s very smart, and will ignore manually inserted line breaks on long URLs as well.
You can select the character style to apply as well as the scope of text to change (Document, Story, or Selection).
7. Change Case by Style
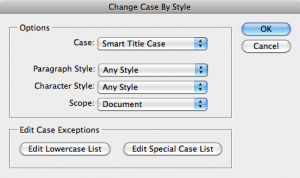
This utility will change all text with the specified style(s) to the selected case.
There are four different options: UPPERCASE, lowercase, Smart Title Case, and Sentence case. Uppercase, lowercase, and sentence case are the same results you would get by changing the case manually. Smart Title Case, is (as the name suggests) very smart! It will automatically convert text to title case based on complex rules!
The rules which the title case uses are as follows:
The first and last words are always capitalized, as well as any word following a period (full stop) or colon. Any compound word separated by a “/”, “.”, dash or m-dash will have the letter immediately following the separator capitalized. Any other word will be capitalized unless it appears in the lowercase word list. Any word appearing in the file will be lowercase only if it is not a “starting” word. For example: In the title, “The Last of the Mohicans”, the first word “the” will be capitalized, while the second time “the” appears will not. This is because the first word is the beginning of the sentence. Similarly, in the title, “Lion: The King of the Jungle”, the first word “the” will be capitalized because it follows a colon. The lowercase word list can be edited to include any words you like. All words should be separated by a single space.
Any word appearing in the special case list will always be capitalized exactly as it appears in the file, regardless of position. This is useful for words like “InDesign”, “USA”, “UK”, etc., which have capitals in the middle of the word. This file can also be used to force lowercase on specific words and override the default rules. So, let’s assume you would like the word “a” to always be lowercase, even if it is the first word in your header text. You would simply put the word “a” in your special case list, and it will always be lowercase. When a word appears in both lists, the special case file supersedes the lowercase one.
The Smart Title Case of Formatting Tools uses the same logic as the Smart Title Case of Power Headers, and the same word lists are used for both plug-ins. Word lists should only be edited using the provided dialogs.
You can select a paragraph style, a character style, or both for options of which text to convert. You can also select what scope of text to convert (Document, Story, or Selection). If neither a character style or paragraph style is selected, all the text in the selected scope will be converted.
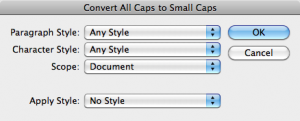
8. All Caps to Small Caps
This utility will convert text encoded as all caps to proper small caps. It offers a lot of flexibility in the styles it converts as well as the range of text it converts:

We hope to add more utilities in the future. If there is a formatting utility that you would like to see added to this collection, please contact us at wishlist@in-tools.com. Registered users are eligible for free upgrades as new functions are added.


Hi Harbs – It was nice meeting you at PePCon. I want to download your style utilities with the free activation code I received at the conference. Do I just use the “Download Trial” option? Not sure what I should do. I want to use the Create Hyperlinks from URLs option. Some of ours drop out because they break into two lines and only the first part appears in hyperlink obviously directing to the wrong destination. Thanks and Have a great day!
The trial download is fully functional. After activation it will work indefinitely.
[…] awesome Style Utilities pack of plug-ins from […]
This is awesome! I downloaded the trial specifically to Change Case by Style and that alone would be worth the $39. I can see that I will regularly use several of the commands. As soon as my boss okays it, I will purchase. Well done!
SO happy to have found this! Laying out a ~100 page catalog where product names used to be in ALL CAPS but now of course customer wants to change to Title Caps – was baffled there was not a way to do this in ID CC2014….when will they release this (obvious!) feature?? Anyhow, thrilled to have installed your plug-in and got my entire layout updated in less than a minute….whew!!! THANK YOU!