Blog

Show Hyphenations Script

Posted by: on: January 2nd, 2011 | 1 Comment

Good book publishing is all about the details. One aspect of those details is fine-tuning how words break across lines. InDesign gives very good hyphenation control, but sometimes there is no replacement for the trained human eye.

This script simply makes it easy to find hyphenated words and decide how they should be handled. The script searches the text of your curent story and stops by the next hyphenated word and selects it.

Download the script from here.

For more great hyphenations scripts, be sure to check out Peter Kahrel’s collection here.


All Caps to Small Caps Script

Posted by: on: December 30th, 2010 | 1 Comment

One of the tedious tasks in quality book layout is ensuring that small caps are applied instead of all caps. Style Utilities has an advanced function for solving this issue, but we offer here a simpler script which might help for certain cases.

Why not use GREP styles?

A GREP style to apply small caps can help in some cases (and you can read more about this approach on InDesign Secrets), but there’s a number of problems with that approach. The biggest problem, is it does not work for fonts which don’t have true OpenType small caps. Of course, it’s only a solution for users of InDesign CS3 or later, and too many GREP styles also adversely affect performance.

This script searches your document for all caps text and converts it to lowercase and applies small caps to the text. Additionally it creates a character style which you can adjust to fine-tune the results.

Download the script from here.

Text before running the script:

All Caps Example

The same text after running the script:

Small Caps Example


History Scripts

Posted by: on: December 29th, 2010 | No Comments

InDesign offers incredible undo support. The number of undos available in InDesign are virtually limitless! However, it can be very tedious to undo multiple times. It’s also error-prone because you can undo too much by mistake if you are doing it many times in quick succession.

While there are other products out there which offer multiple undo in different ways, we have found these simple scripts to be very useful.

The History Scripts can be downloaded from here.

Using the Scripts:

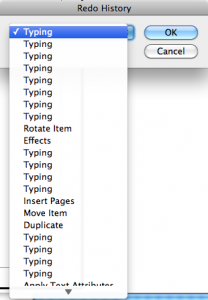
Included are two separate scripts. One is for undo, and the other is for redo. The both pop up similar dialogs which allow stepping forward or backwards through the undo or redo stack. You can select which point you’d like to go to in the stack by name from a simple drop-down dialog:
Undo History Redo History

You can even use keyboard navigation to open the drop-down and select the correct history position to revert to.
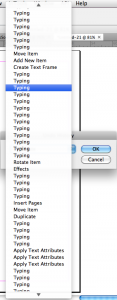
Undo History Menu Redo History Menu

Installation:

When installing these scripts you must copy the folder which contains the scripts in its entirety to the script panel folder. There should be three files in the folder as shown:
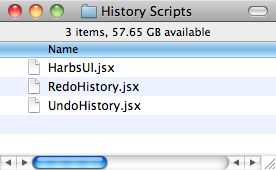
History Scripts Folder

Keyboard Shortcuts (Effective Use):

A particularly effective way of using these scripts is by assigning keyboard shortcuts to them to access the dialogs very easily. You might even want to assign the default undo and redo shortcuts.


Separate Pages Script

Posted by: on: December 27th, 2010 | 1 Comment

When publishing books with facing pages and bleeds, there is sometimes where you’ll need pages to have an inner bleed, but you don’t want pages to bleed onto one another (because they might have different images. One particularly blatant example of this is when publishing spiral bound books.

This situation is a bit of a pain to set up correctly in InDesign, and there has been numerous discussions on various forums how to deal with this problem. One such discussion took place on InDesign Secrets some years back.

We wrote a script back then to deal with this problem, and the script has been quite popular for many years. You can download the script from here.


Fix Paragraph Leading

Posted by: on: December 24th, 2010 | 6 Comments

There’s a relatively common problem where the last line of a paragraph can get inexplicably spaced differently than the rest of the paragraph. For a full explanation please refer to this great post on InDesign Secrets.

We wrote this simple script to fix the cause for these “rogue line spacings”. Basically, what the script does is makes the leading of the paragraph return equal to the text before it.

You can get the script here.